Wednesday, 30 January 2013

MAC Girl About Town | Review

Hello Lovelies!
I recently acquired a multitude of lipsticks as late Christmas presents (my friends know me well!) so here is the first in a series of reviews. Girl About Town, one of MAC's permanent collection of 'Amplified' lipsticks, is one of the most commonly talked-about MAC products I see on blogspot. Its popularity as a shade inspired both a lip glass and a nail polish to be made to add to the colour collection.
Girl About Town is described by MAC as a "bright blue fuchsia" and the product itself is certainly that: a darkened intense fuchsia with blue undertones (great for making teeth look whiter!). As it is an amplified creme lipstick it is incredibly moisturising (this doesn't stop after the initial period of wearing it) and it glides on very smoothly! The lipstick is vanilla scented - although not strongly, more of a gentle sweet aroma. It is also great for being opaque - I find that one coat gives a highly pigmented and beautifully shiny coat to my lips! The wear for me is around four hours - but it's one I'd definitely reapply to keep my big bold lip! 
I couldn't help but try it out immediately I received it.. and then a little more thereafter (but shh!) so apologies for the used look in the photos!
As its such a popular colour you will find soooo many beauty bloggers/gurus rave about it on the internet! And I'd say that it's most definitely worth the hype! However with such a lip-popping colour as this you need to wear it! hehe. So go forth and be bold and beautiful! You can pick this up at your local MAC counter or online here, for just £14.

Rachael XX

Saturday, 26 January 2013

The Body Shop New Winter Trend Makeup | Get The Look

Hello Lovelies!
Yesterday I blogged about The Body Shop's New Winter Trend Makeup which I had the opportunity to try out and create a unique makeup look with for their facebook page using the products. The first post which you can view HERE gave you a sense of the products that I was using, so if you haven't seen it yet please check it out! In this post I'm going to share with you the makeup look I came up with :)

First thing's first, here is a link to the album on The Body Shop UK's facebook page: Rachael's Party Make-up: Get the Look. I'm lucky now to in fact feature in two of their photo albums - having also allowed them to use my blog photos from my post Revisted: The Body Shop Lip and Cheek Stain Review for their Lovely Lips album. 
The makeup look I went for diverted from the traditional smokey eye look which the Smokey Eye Palette: Smokey Copper which I used is best attributed with. Instead I explored the iconic 1960's makeup of Edie Sedgwick, an American actress, socialite, fashion model and heiress, who unfortunately came to a very sad end. I really love how bold her illustrious makeup style is, so infiltrated some of her attitude into a more classic smokey eye look to create this. 
Guide to Get The Look
 1. Apply your favourite foundation or BB cream, buffing it into your skin with a stippling brush

2. Over your eyelids apply a thin layer of eyeshadow primer, being sure to blend in fully at the edges of your eye:


3. Using the eyeshadow brush provided, sweep shade 1 (from the Smoky Copper palette http://bit.ly/TkOP2m) across your lid:

4. With the same brush, blend shade 3 over the outer third of your lid, working it into the lighter colour:

5. Sharpen the Golden Brown Eye Definer (http://bit.ly/RTLnh2), and carefully draw a thin line along the top edge of your socket line, going quite far into your inner corner
6. At the outer third of this line, increase the thickness, working in small quick strokes to get the shape, and wing out:
7. Using the angled eyeshadow brush loaded with shade 4, press the eyeshadow onto the pencil line, to set the pencil

8. Take a larger eyeshadow brush or blending brush, and work in the colour to your socketline, blending out and softening the line:
9. At the outer edge of your eye, blend the colour down to the bottom lashline, to create a more smoky effect:
10. Using the angled brush, sweep some colour under the lashes on the bottom outer corner of your eye:
11. Taking shade 2 on the blending brush, lightly blend it above the dark socketline area, 
and use shade 1 as a highlight above this

12. Using a gel or liquid liner, line your top lashes with a thin black line, winging the end:

13. Apply a volumising mascara to the top lashes and outer two thirds of your bottom lashes:
14. Now apply concealer, making sure to cover the area under your eyes to brighten the look

15. Taking the Dazzling Rocks - Golden Copper (http://bit.ly/TkPfWK) bronzer on a kabuki or blush brush, sweep above your cheekbones

16. Work the colour onto your temples and jawline, centring the colour on your cheekbone; beware of creating shine down the centre of your face!:

17. Add a pink cream or powder blush to the apples of your cheeks, and buff the colour on your cheeks into your foundation

18. Use a setting powder across your face, focusing on your T-zone and under your eyes
19. Fill in your eyebrows, to balance the heaviness of the make-up look
20. Finish the look with The Body Shop Cheek and Lip Stain in 'Bronze Glimmer'  on your lips:

This is definitely a party makeup look rather than a 'throw-on-your-face-before-work' type thing (As one woman commented on the fb photo... (!)) Haha. But I hope you like it, or at least try something new with your makeup and maybe get inspired by Edie Sedgewick's celebrated style :)
...And yes, I'm wearing a primark owl onesie in these photos ;)
Rachael XX

Friday, 25 January 2013

The Body Shop New Winter Trend Makeup | Review

Hello Lovelies!
I've been incredibly off blogger radar of late, but intend to get back into the swing of thing with a couple of Body Shop posts.
Over December I was fortunate enough to get to sample some of The Body Shop's Winter Trend Makeup range, after a twitter call-out for willing volunteers (who wouldn't want to!?) In return I had to create a unique winter trend makeup look for their facebook page. My next post will be a 'Get the Look' guide, but in this one I thought I'd introduce you to the products:
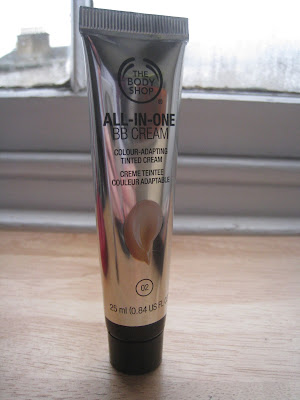
Cost: £12
Highlights: Light to medium coverage, colour-adapt technology
Disclaimer: The shade I was sent, 02, is a bit too dark for my very pale skintone! 
However I'm keeping it for summer when I get on the tanning bandwagon ;)

Cost: £8
Highlights: Smooth water-resistant eyeliner, doesn't budge during the day, lovely metallic shimmer
Cost: £16
Highlights: Delicate shimmery bronzer, great even on pale skin, brightens your makeup look, lasts forever!
Cost: £14
Highlights: Highly pigmented, wonderful highlighter shade, create warm smokey eye, very shimmery! 

Rachael XX